Most
Arcade games and the popular ATARI games use a special type of "Action
Graphics". Our ATARI also has this type of graphics. Unlike regular
graphics, player-missiles move smoothly across the screen and are not
accomplished by using the ATARI BASIC graphic commands. This type of graphics is
called "Player-Missile Graphics". Star Raiders for instance, uses
Player-Missile Graphics (PMG) for the Zylon ships and starbases. Many other
games use PMG; such as Space Invaders, PacMan, Missile Command and of course,
Defender.
Before
you skip to my program on the other page, read this so you know what's going on.
There are two parts to PMG: the player, an object eight bits or dots wide and
tip to 128 dots long, and the missile, which is a small player. There is one
missile associated with each player. Since we have 4 players, (that's the limit
if you use missiles, more on that later) then we have 4 missiles. Each missile
takes on the same color as the player it is associated with and is independent
of that player. The missile is smaller than the player and it is less detailed
than the player.
The
main purpose of PMG is that it can move an object smoothly over a background
(regular graphics or text) without disturbing the background because it is
independent of the graphics. The reason why it is smooth is because you have to
design the object beforehand and place it somewhere in memory. Since it is
always the same picture (unless you change it for animation or whatever), all
that needs to be changed is the horizontal and/or vertical position.
First
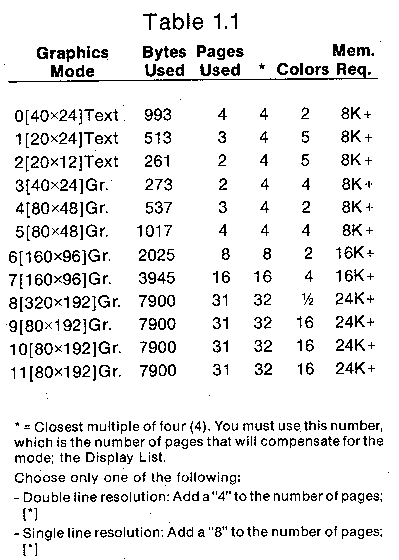
of all, let me get you started. First pick a graphics mode for your background.
You 8K users should use graphics 1, 2, or 3 because they use the least amount of
memory. You must have at least 24K or more to use Graphics 8, 9, 10, and 11 with
PMG. Also, take into consideration that to safely put your PMG in memory you
must allow at least 4 pages* of memory free for double line resolution. That is
equivalent to a graphics 7 dot, which will be the size of the dot in every one
of your players or missiles. You can get single line resolution by allowing 8
pages of memory. This is equivalent to a graphics 8 dot. (See Table 1.1)
Before
we actually start to work on making a PMG program, we must design the players
and missiles beforehand. First, if you plan to design games or programs that use
PMG, go down to your local stationary
store and buy a very large pad of 1 cm by 1 cm graph paper. If you want to see
what the PMG would look like on the screen get a smaller size 1/4 cm by 1/4 cm.
Using the graph paper will enable you to design the PMG bit-by-bit.
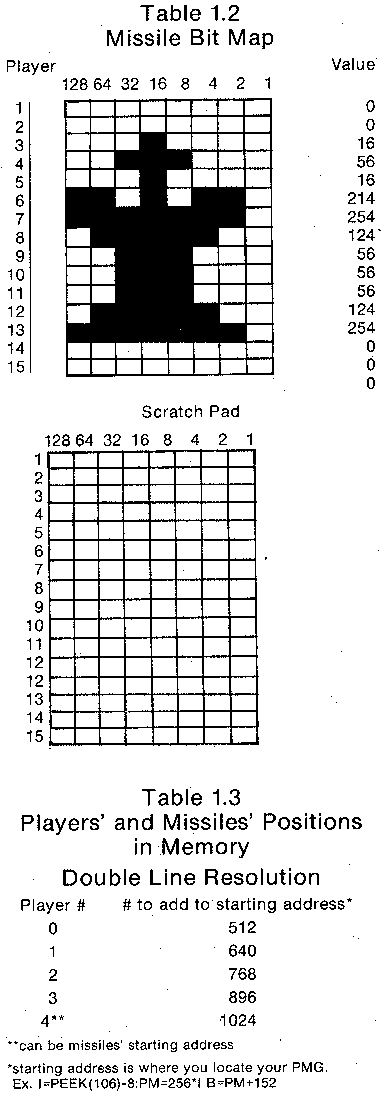
First,
to start drawing in PMG let's draw a player, because it is the simplest to draw
and will give you some experience in drawing bit maps. Remember how I said that
a player was 8 bits or dots wide? On your graph paper find eight consecutive
columns and number from left to right like this (128, 64, 32, 16, 8, 4, 2, 1).
Notice that going from left to right the numbers decrease by half and also note
that all these numbers, when added together, add up to 255. Each dot in your
player must be within the eight column grid. The length of your player is
determined on how long you want your player to be (128 is the maximum you can
have on the screen at once.) Each dot in your player takes up a full block on
the grid. Now draw your picture within the grid. (See Table 1.2)
Once
you have finished drawing a picture, there is still the problem of feeding the
computer the information about the design of the player. What we do to find how
to put the picture in the computer is to go to the first row of the picture and
add up the dots that are in each column. Say that there is a dot under column
128 and there is one dot under column 16 and another dot under column 1 you
would get the sum of those numbers to find the value of the line, in this case
145. Do this to every line in your player, put the result to the side in order.
You see, the computer handles these graphics like a stack of numbers piled one
on each other. Notice that since these numbers are less than or equal to 255
then they can be poked into memory.
Here
comes the tricky part. If you want double line resolution you must put aside 512
bytes of memory for the vertical movement of your player. If you want single
line resolution, you must put aside 1,024 bytes of memory, the equivalent of one
K of memory. I will explain what to do with these numbers later on. Since the
computer relocates this stack one scan line vertically you must place one or two
zeros at the top and bottom of your player. This will allow your player not to
stretch across the screen, but move vertically.
Okay,
we now know that we can safely put our PMG
in memory and how to draw players. So everyone can enjoy this article, I will
suppose that I have an 8K machine (How did I lose 40K???) so you 8K users can
join in on the fun. First, I will use Graphics 2 so I can conserve memory.
10
GRAPHICS 2
Now
I still want single line resolution, so my display looks nice. That means I must
put aside 16 pages of memory for my use.
20
I=PEEK (106)
Now
we must store it in PMBASE, a register (location) so our ATARI knows where we
put our players and missiles.
30
POKE, 54279, 1
Next
let us tell the Antic Chip it can take enough memory for graphics mode and PMG
that it needs. This is called Direct Memory Access - DMA. If you want double
line resolution your number is 46. If you want single line then your number is
62, We want single line!
40
POKE 559,62
Now
we come to the next step, a location called GRACTL (53277). 1 believe it stands
for Graphics Control. This is what to poke or store at GRACTL.
# If
you want to use
1 Missiles DMA
2 Players DMA
3 Players and Missiles
We
want to use both players and missiles for the fun of it.
50
POKE 53277,3
This
location tells the graphic chip in your computer the CTIA (if you have bought
your Compute; after January 1st the chip is the GTIA, a more sophisticated chip)
to accept PMG.
Now
we come to color. Since we cannot use the COLOR command or SETCOLOR, we have to
use registers. In ATARI BASIC, if you say COLOR 1, the color is set to Gold or
whatever, then by using SETCOLOR you can change it. SETCOLOR 1, 10, 14 would
change color 1 to another color. Actually BASIC use of the color command is not
actually in the hardware but the SETCOLOR command is in the hardware. The color
is always set to zero (black), and Setcolor can change it. Here are the
equivalent POKEs.
SETCOLOR
Register 1, Hue 10, Luminance 14
(POKE
Register + 708, HUE * 16 + Luminance)
Now
PMG colors are below that. Pretend instead of the register being added to the
first location let the player be substituted and change 708 to 704 (the PMG
SETCOLOR). Remember the missile takes on the same color as the player.
(POKE
Player # + 704, HUE * 16 + Luminance)
(See
chart for HUE numbers and colors)
Now
back to our program. We want a white player 0.
60
POKE 704, 14
Remember
SETCOLOR Player 0 + 704, 0, 14.
This
program will use only one player, just to demonstrate player missile graphics.
That
means that we have to find the place in memory to store our player, the chess
king on Table 1.2. Do this:
70
PMBASE=I*256
This
finds the starting address of the players. Now let's find the starting address
of the player we want, PLAYER0. We want single line resolution, so we add 1024
to the PMBASE. We now set up the X and Y locations of the player and the
vertical and horizontal positions of the chess piece.
80
PLAYER=PMBASE+1024:X=100:Y=100
We
must erase all previous PMG in memory or at least the spot we are using. If you
do not do this, when you RERUN the program you will see multiple images.
Speaking of images, is you use high-res GRAPHICS and you do not allocate enough
memory for your players you will find some unneccessary screen display.
85
FOR A=PLAYER0 TO PLAYER0+256:
POKE A,0:NEXT A
Now
"Read" player from data statements.
85
L=14
90 FOR A=PLAYER0+Y TO PLAYER0+Y+L:
READ B:POKE A,B:NEXT A
Now
line 90 draws the player at the Y or vertical coordinate. Line 100 will set the
X or horizontal coordinate.
100
POKE 53248,X
Location
53248 is Player0's movement horizontally. Now we come to size. In PMG you can
have three different sizes: small, medium, or large and two different
resolutions: single and double line. We want our king to be medium.
Although this program
does not use collision detection, I will still explain them. Collisions occur
when two players touch each other, a missile touches a player, a player makes
contact with a background object, or a missile hits a background object.
(See memory map for
registers).
If there is a collision
and you PEEK at your specific register, the computer will respond with a number.
The number depends on what you are looking for. For example, if you are looking
for a collision between PLAYER0 and COLOR 1, your result will be 1, COLOR 2 will
be 2, etc. The same thing goes for other players only it will refer to the
player number.
Now we have to add
joystick movement to the program.
130 C=STICK (0)
131 IF = 15 THEN 130
132 POKE 77, 0: REM ATTRACT MODE OFF
133 IF C=11 THEN X=X: POKE 53248, X
134 IF C=7 THEN X=X+1: POKE 53248,X
135 IF C=13 THEN FOR D=L TO 0 STEP -1: POKE PLAYER0+Y+D, PEEK PLAYER0-1+Y +D):NEXT
D:Y=Y+1
136 IF C=14 THEN FOR D=0 TO L:POKE PLAYER0-1+Y+D, PEEK(PLAYER0+Y+D): NEXT D:Y=Y-1
137 GOTO 130
That's it for now. Look
over the charts and tables I have prepared for your use and happy programming!