Using the PERCOM Drive with Double-Sided Disks
by Kevin Lever
I recently purchased a Percom Disk Drive as a first disk drive for my ATARI 800. 1 was quite impressed with the double density storage capacity when, in transferring my cassette-based BASIC games to disk, I found I was able to put all of the games on one disk! So, of course, I went out and bought a disk-based adventure game to find out what random-access files were all about. Here I found my first major obstacle: The adventure game consisted of three double-sided disks, six sides in all, but the disk drive is single sided. No problem on the 810 drive, true, but with Percom it's another story.
It seems that the 810 by ATARI uses a timing sector, recorded at format time, to let the drive know where the disk is. However, most other systems use the little hole in the lower-right side of the disk, together with a properly oriented LED and sensor in the drive itself, to keep the system informed of disk position. Such is the case with the Percom disk drive. So, when a program is recorded on both sides of a disk, the ATARI 810 drive cares nothing of the timing hole in the disk. It has no trouble locating side-two dam But now consider the Percom unit: It always expects to find the timing hole in the lower right comer when the disk is inserted into the drive. Now, if we flip the disk over to read side two, the timing hole will be on the lower left. The LED and sensor in the disk drive sees only cardboard on the lower right, and can't read the disk!
An industry-standard drive equipped to read either side of a disk should have two sensors, one positioned to read the timing hole at the lower right, and the other located at the lower left. The user flips a toggle switch on the front panel to inform the drive which side of the disk it-will be reading. The Percom single-sided drive is not so equipped. So what do we do with commercial software recorded on both sides -of a diskette? We make an extra hole in the disk jacked Now, either way the disk is inserted, the sensor will be able to locate one of the timing holes.
The procedure is very simple, but care must be exercised to avoid damaging the diskette or getting fingerprints on the magnetic surface. If this happens, you might as well throw that disk away. (Not so fast. See Charles Bachand's "Burp" program in Issue No. 9.) However, if you are careful and methodical, you should have no problems. As a precautionary step, first wash your hands and then find a clean, uncluttered work surface.
The first step is to obtain a "crashed" diskette, either from your own misadventures or from your local computer store. Odds are, if the store demonstrates programs for its customers, they will have a few disks in the wastebasket. You are going to make a template. Take the "crashed" disk and carefully slit open one edge of the disk jacket with a sharp knife. Remove the disk itself and throw it away. Save the jacket, and put a label on it reading "TEMPLATE" and add it to your library.
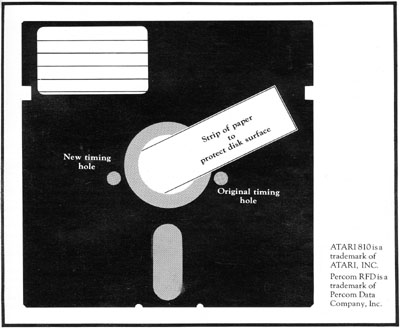
Now it's fairly easy to modify your disks for use on the Percom. drive. Retire to your handy work area with the template, the disk you're going to modify, a pencil, a hole punch, -and a strip of paper. Refer to the diagram as your proceed. Place the disk to be modified, flat on the table, label side up. The timing hole should be on the lower right. Now place the template over the disk, but with the timing hole on the lower left. Carefully match up the edges accuracy is important - and mark the perimeter of the timing hole onto the disk jacket of the subject disk. Press very gently with the pencil. Now flip over the subject disk and repeat the procedure to make a mark on the lower right, directly behind the mark on the other side. This is where you will punch the new hole.
The idea is to punch a hole through the disk jacket, but not through the disk itself. That is the only tricky part, and you might try it once on a disk you don't care too much about. You are going to have a insert one part of the hand punch between the disk jacket and the disk itself, once on each side. I recommend slipping a strip of paper inside the disk jacket to protect the disk surface. Again, refer to the diagram. (You might also make sure your punch isn't magnetized!) If you damage the disk surface or warp the disk, it will be ruined, so don't blame me if you fail to heed this warning. Now slip the punch inside the disk jacket and punch a hole where you made the mark. Again, punch the jacket only. Repeat the procedure on the other side. You can now read both sides of the disk!
The procedure I have described will enable you to use commercial software which is recorded on two sides of a disk. It will also enable you to use both sides of your own disks. It will almost definitely void the warranty on your commercial software, so check with the retailer and be advised. When writing to both sides of your own disks, remember that side two was not certified, so you're on your own. I have had no problems at all.
I guess there is some advantage to owning an 810 drive. But for me, the capacity to use double density far outweighs the few minutes it takes to do the modification. Good luck!